

Publié le
Annual Maintenance Checklist for Injection Mold Cooling Systems: Follow It and Add Two Years to Component Life
1. Why Bother: The Math Is Simple
A factory molding appliance housings ran three machines for three years without cleaning a single circuit. First came occasional dimensional drift — a process tweak fixed it. Then one circuit's flow kept dropping, mold temperature stopped holding, and the circuit plugged solid. Mold pulled, lines rodded, seals replaced, trials rerun: six days down.
Six days of downtime, teardown labor, scrapped startup parts, a missed delivery. The total ran well into five figures.
On schedule, the same job would have cost a few hundred in cleaning chemicals and half a day of planned downtime.
That's what maintenance is: converting unplanned downtime into planned downtime. The gap between the two is typically five times or more.
The quieter loss: scale conducts heat at 1–3 W/(m·K); brass runs about 120 — nearly fifty times worse. One millimeter of scale is a quilt over your heat exchange surface. Nothing alarms. Cycle times creep up, yield slips, the power bill edges higher. Those numbers scatter across reports, and nobody connects them to the water circuit.
2. Daily: Five Minutes, Any Operator
No tools, no shutdown. Four things to glance at during a mold change:
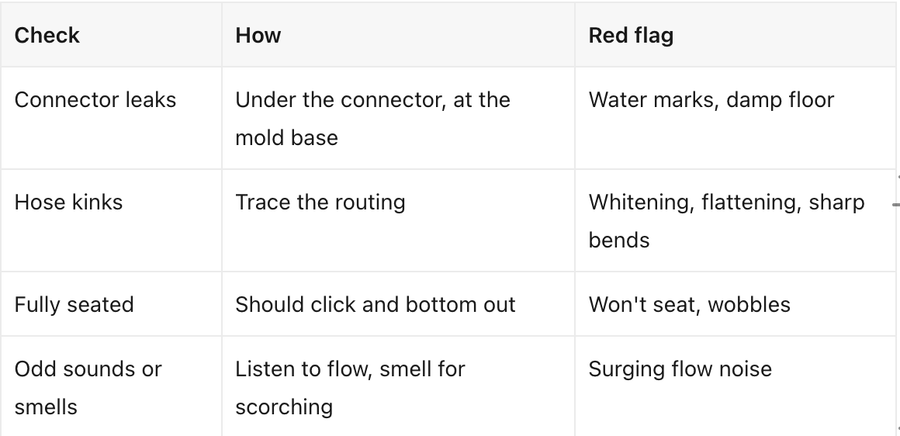
The habit that matters: write it down. Even "machine 3, connector 2, slightly damp" on a card by the press. No records, no trend. No trend, and you're just waiting for failure.
3. Weekly: Watch Two Numbers
Flow. Log every circuit, or watch the indicator float. The standard isn't "is there water?" — it's has it dropped since last week? Down more than 10%, investigate: clogged filter, undersized bore, or scale forming.
Inlet–outlet ΔT. Normal is 3–5°C. This number points straight at the cause:
Wider — insufficient flow. Check clogs, bore size, pump.
Narrower — poor heat transfer, or a wrong setpoint. Check the TCU, supply temperature, cooling tower.
Also check circuit balance: parallel branches should stay within 10%. The low branch is the one that will clog first.
4. Monthly: Take O-Rings Seriously
Pull two or three connectors that see the most mold changes.
O-ring condition. Roll it between your fingers. Hardened, tacky, flattened with no rebound, fine cracks — any one means replace the set. Don't wait for a leak; O-rings fail with no warning.
Insertion feel. One-handed, with a clear bottoming sensation. Gritty means debris or scoring on the cone. Loose means wear. Your hand finds this earlier than your eyes.
Cone and threads. Wipe clean, inspect the cone under raking light for ring scratches, the threads for galling.
While you're there: clean the filter screen and count spares. Running out of spares is what turns a small problem into a stopped line.
5. Every Six to Twelve Months: The Thorough One
Flush the circuits. Circulate cleaner at the maker's concentration and temperature, then neutralize and rinse thoroughly. Residual chemical attacks seals — rinse poorly and you've paid to accelerate aging.
Test the water. Hardness, pH, chloride, conductivity, iron. Water data is the only real basis for cleaning frequency. In hard-water regions, twice a year may not be enough.
Replace wear parts. All O-rings regardless of appearance, stiff hoses, deformed gaskets. On TCU circuits, verify the temperature rating.
Pressure test at 1.5× working pressure, every joint.
Keep a log — dates, water data, part batches. With a log you graduate from scheduled to condition-based maintenance.
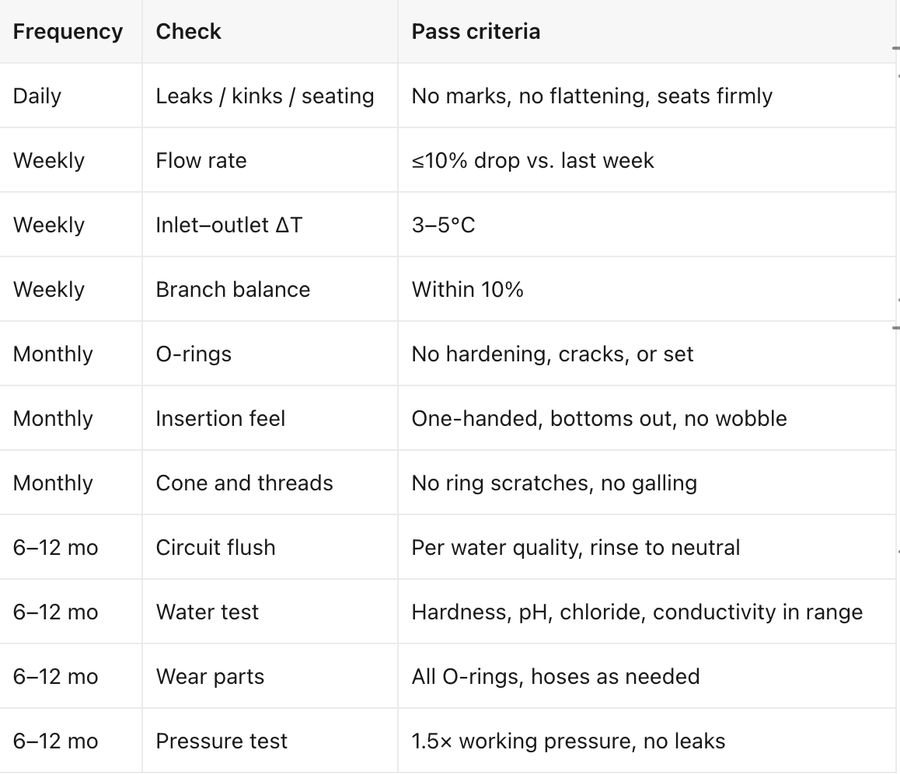
6. One Table, Taped to the Press
One Last Line
How long a component lasts depends half on the component, half on how often you look at it.
Maintenance isn't an extra expense. It's one large future bill, split into small installments starting today.